Summer headbands
Easy & quick summer project with lots of scope to make it your own! This is also a great scrap yarn project.

We’re going to start with the beginners’ version and move up in difficulty from there. Scroll down for the lace version and ideas for modifications.

Pick your yarn and needles 🧶
For a summer headband, I would absolutely go with a cotton yarn, but there’s no reason not to experiment with other fibers.
My favourite experience when making these headbands was with Rowan Summerlite 4ply on 3mm (US 2.5) needles.
A note on gauge / tension
- You can work with any yarn and any needle size, but if you’re newer to knitting, check the yarn band for a recommended needle size and go with that.
- I’ve included the specific yarn and needle size I used for the different samples shown in this post, but don’t be afraid to experiment!
- This is one of those rare patterns where it’s fine if you want to skip making a gauge/tension swatch. Just cast on, work a handful of rows and see if you like it. If your knitted fabric feels too loose or too thick, just pull it apart and try again with different sized needles. Easy experimentation at its best.
Sizing
- In the instructions below, I say to use the circumference of your head as an indicator of length. You can obviously use any other person’s head as your measuring stick if you’re knitting a gift!
Basic Garter Stitch Headband (Beginner-friendly!)
All you need to know is how to cast on, bind off, and how to work a knit stitch. At the end, you have two options: sew the cast on and bind off edges together, or make the headband long enough to tie in a knot.


A basic garter stitch headband in lilac
- I used Cloudborn Pima Cotton and size 3mm [US 2.5] needles. The yarn is recommended for slightly bigger needles (4mm [US 6]). By going for a smaller needle size, I made a slightly sturdier headband. Substitute with any DK-weight cotton yarn.
- The finished sample measures 1.75 cm * 64 cm [0.75 in * 25.25 in]. I used 10 g of yarn (approx. 21 m [23 yds]).
Instructions
- Cast on 5 sts. (Cast on a different number of stitches to make your headband wider or narrower.)
- Work back and forth in garter stitch (knit every row).
- For a tie-together style:
- Continue until piece measures at least the circumference of your head plus an additional 10 cm [4 in] from cast on edge when stretched slightly.
- For example, the above lilac sample is 64 cm when lightly stretched. This is the circumference of my head (54 cm [21.25 in]) + 10 cm [4 in].
- For a seamed style:
- Continue until piece measures the circumference of your head when lightly stretched.
- For both styles, bind off loosely. Weave in ends. Optionally block the piece.
Tapered Garter Stitch Headband (Beginner-friendly!)
Similar to the above, but you will need to know yarn overs, knitting yarn overs twisted on the next round, and the knit 2 together decrease (k2tog).


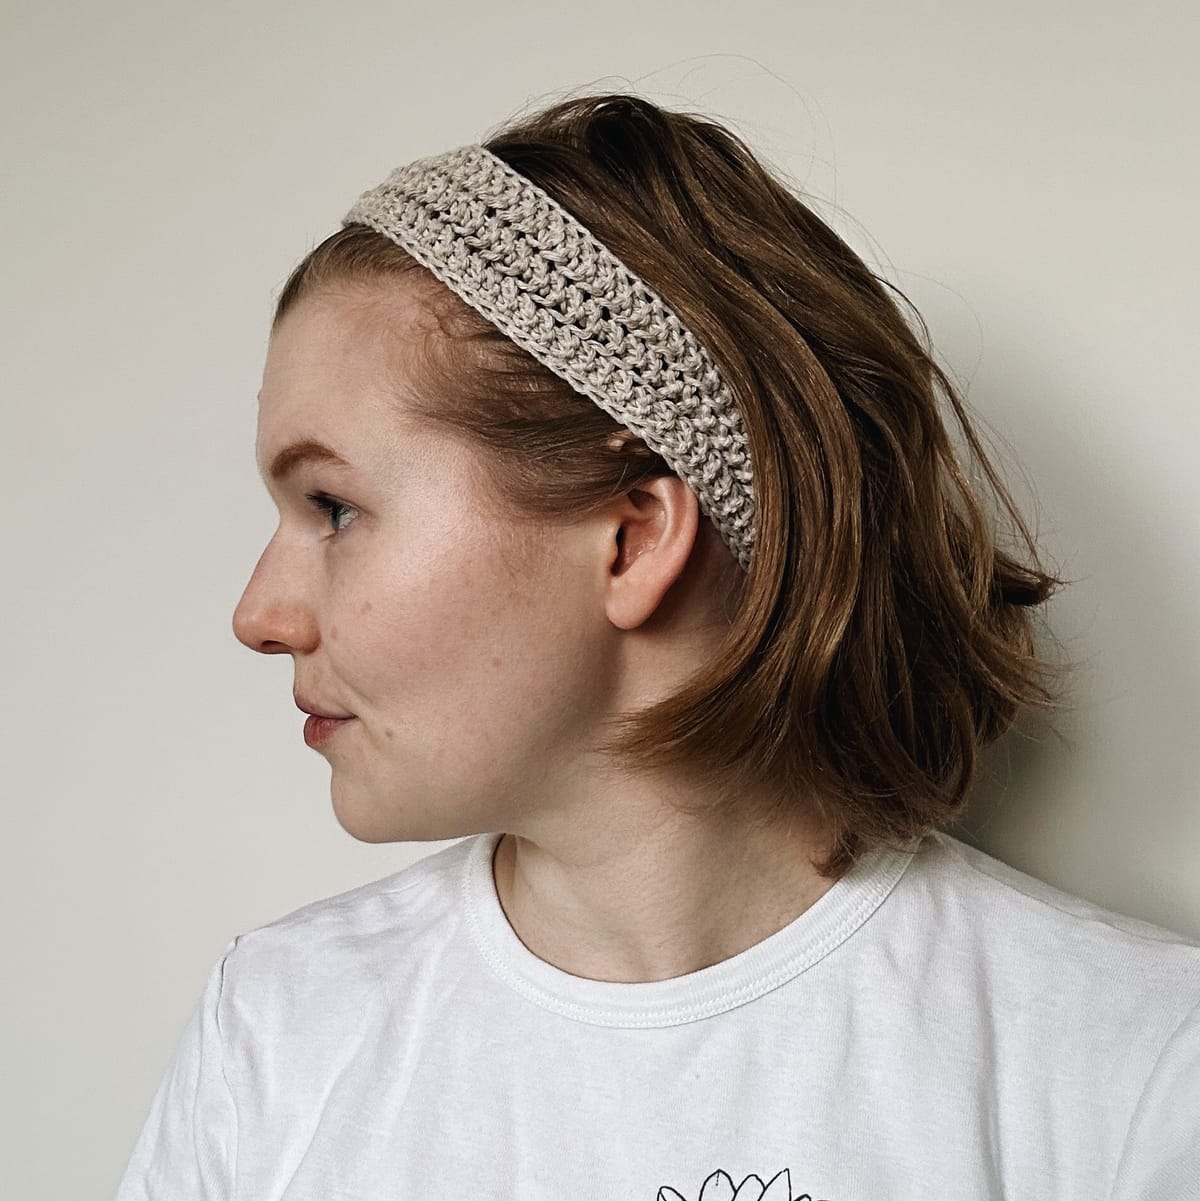
A tapered garter stitch headband in beige
- I used Rowan Summerlite 4ply and size 3mm (US 2.5) needles. Substitute with any 4 ply cotton yarn.
- The finished sample measures 4 cm * 82 cm (1.5 in * 32.25 in). I used 12 g of yarn (approx. 42 m [46 yds]).
Instructions
- Cast on 4 sts.
- Work two rows back and forth in garter stitch (knit each row), but slip the first stitch on each row for a tidy edge.
- Complete increases as follows:
- Row 1: slip the first stitch, knit 1, yarn over, knit until end of row.
- Row 2: slip the first stitch, k1, knit twisted the yarn over from the previous row, yarn over, knit until end of row.
- Row 3: slip the first stitch, k1, knit twisted the yarn over from the previous row, work until two stitches remain, yarn over, knit until end of row.
- Repeat Row 3 until you have 12 sts on the needle. (Alternatively work more increase rows for a wider headband.)
- On the next row, slip the first stitch, k1, knit twisted the yarn over from the previous row, work until end of row.
- Continue working garter stitch while slipping the first stitch on each row. As you work, decide how long you want your headband to be. I recommend at least the circumference of your head plus an additional 10 cm [4 in].
- For example, the above beige sample is 82 cm [32.25 in] when lightly stretched. This is the circumference of my head (54 cm [21.25 in]) + 28 cm [11 in]. This leaves longer ends to tie together.
- Once you are about (2.5 cm [1 in]) away from the completed length you want, work the decreases as follows: (Note that the decrease section will measure about the same as the increase section, and so may be longer than 2.5 cm [1 in] if you worked more increases at the beginning.)
- Row 1: slip the first stitch, knit until 4 stitches remain on needle, knit 2 stitches together (k2tog)
- Work Row 1 until you have 5 stitches remaining.
- Work the last decrease row as follows: Slip 1, knit 1, k2tog, k1.
- Knit one more row while slipping the first stitch.
- Bind off loosely. Weave in ends. Optionally block the piece.
One-row Lace Headband (Intermediate)
This is a simple lace pattern for an intermediate knitter! The instructions are written for tie-together headband or a seamed version. You could optionally use a provisional cast on, then use kitchener stitch at the end to join the cast on and bind off edges together.


One-row lace with two lace repeats
- I used Drops Safran and size 3mm [US 2.5] needles. Substitute with any 4 ply cotton yarn.
- The finished sample measures 4 cm * 70 cm [1.5 in * 27.5 in]. I used 12 g of yarn (approx. 39 m [43 yds]).
Instructions
- Cast on 10 sts. (This contains 2 repeats of the lace pattern. To modify the stitch count, make sure you cast on a multiple of 3 stitches + 4 stitches for selvedge.)
- Knit 1 row.
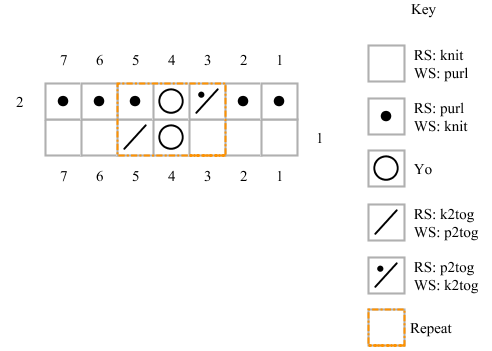
- Work back and forth in lace stitch according to Chart A below, or following the written instructions.
- For a tie-together style:
- Continue until piece measures at least the circumference of your head plus an additional 10 cm [4 in] from cast on edge when stretched slightly.
- For example, the above brown sample is 70 cm [27.5 in] when lightly stretched. This is the circumference of my head (54 cm [21.25 in]) + 16 cm [6.25 in].
- For a seamed style:
- Continue until piece measures the circumference of your head when lightly stretched.
- For both styles, knit 1 more row, then bind off loosely. Weave in ends. Optionally block the piece.
Chart A: basic one-row lace

Written instructions for Chart A
Row 1 (RS): K2, *k1, yo, k2tog*, repeat until 2 sts remain, k2.
Row 2: K2, *k1, yo, k2tog*, repeat until 2 sts remain, k2.
As you can see from the chart and written instructions, this is actually a one-row repeat. The stitches outside the repeat are the selvedge stitches.
Mix it up!


The top row is a variation of the one-row lace headband. Middle row: a tapered garter stitch headband with a knot tied in the middle. Bottom row: tapered edges on a lace headband.
Above are a couple of variations I’ve worked up this week.
The top row is the One-row Lace Headband in Rowan Summerlite 4ply on 3mm [US 2.5] needles. It is worked with a total of 13 sts (which means it includes 3 repeats of the lace stitch). I’ve used a brioche-style selvedge stitch instead of the garter ridge.
The middle row is the Tapered Garter Stitch Headband (Rowan Summerlite 4ply on 3mm [US 2.5] needles), but I’ve tied a single knot right in the middle before tying the ends together.
The bottom row uses the increase and decrease sections from the Tapered Garter Stitch Headband, except the increases are worked every 6 rows to taper the look more. Then it switches to the one-row lace until it’s time to decrease at the end.
Make it mindful ♥️
I think the great thing about these headbands is that you can really make the pattern your own. It’s also a great mindful make. Whether you go for the garter stitch or the lace, you’re repeating the same stitches on every row, which at least for me, is the perfect time to slow down and enjoy what I’m doing while waiting for my cup of tea to cool down a little.
Which variation will you go for?
